As described before, the LamPI system was designed for- and initially worked only for 433MHz based devices. Over the last months, devices based on the Z-Wave system working on 868MHz (Europe) have dropped in price and are beginning to become an alternative to these cheaper 433MHz switches and dimmers. As the communication between Z-Wave components is 2 reliable, all Z-Wave devices have a transmitter on board and can report their current status back to the server, I decided to look for a way to integrate the 868 MHz system into my LamPI environment.
Also, Z-Wave networks make a mesh network with means that every Z-Wave device acts as a bridge to other Z-Wave devices. This extends the network in a flexible way as devices that are located further away from your controller devices will use intermediate Z-Wave devices to receive and transmit messages through the network to the controller.
If you start reading up on the Razberry documentation, than there are several terms used that are used in this context:
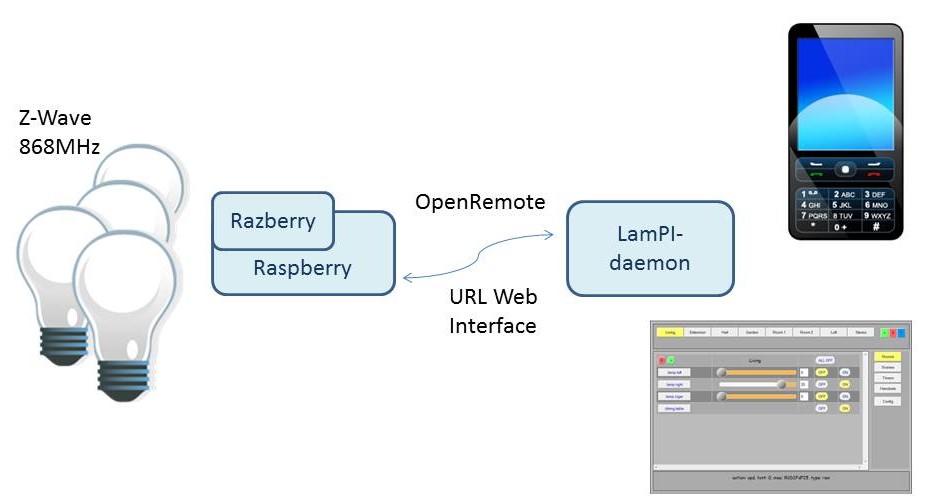
The architecture we are going to use for LamPI is as follows: A dedicated Raspberry PI with Razberry controller will be included in the LamPI system and this controller will only handle Z-Wave devices, sensors plugs etc. In principle it is quite good possible to use the Raspberry/Z-Wave combo for other work as well, even for controlling 433MHz devices, as the Razberry board uses only the first 6 or 8 pins on the Raspberry P1 connector.
The way that we use the Razberry in our network is basically the same as we use the LamPI-receiver in a 433MHz configuration. We can have one or more Raspberry systems running a LamPI-receiver program that will receive device commands from the LamPI-daemon and send incoming sensor values (wireless or through connected sensors) to the LamPI-daemon.
Difference: The LamPI-receiver program communicates to the daemon over a socket connection and is at the moment of writing asynchronous. Meaning that sensors can send their value to the daemon over a socket and the daemon will deal with it and dispatch to connect userinterface(s). The new interface in Z-Way is not yet that far, but the new Home Automation interface of Z-Way offers possibilities to add your own modules.
The hardware installation is a piece of cake. Plug the Razberry Z-Wave board on the P1 connector of the Raspberry device. Make sure that the pins are aligned at the right side of both connectors. You're done.
Login on your Raspberry over a terminal interface and install the Razberry package with he following command.
Probably best to reboot the device now with 'sudo reboot'.
The Z-way software uses two ports on the Razberry system, 8083 and 8084. The administration interface is at http://192.168.1.xx:8084 and can be used to update the system, restart the software or reboot the system. Port 8083 is used to run the GUI for controlling devices.
Start the basic User interface in the browser. http://192.168.1.xx:8083 where 192.168.1.xx is the (=your) IP address of the raspberry on your network. If you do not know the IP address of your Razberry, run the following command from a command terminal:
> sudo ifconfig
and look for the IP address under the eth0 or wlan0 section of the output. When the User interface is started, select the good old expert GUI and select then the "network" tab. Now start the interview for the newly connected Z-Wave device. As soon as the new device is recognized and initialized, remember the device number as we will need it in LamPI to identify the device by its number ID.
The OpenRemote interface would be the obvious choice for bulding a Z-Wave gateway application. but ....
The Zwave webinterface hides a lot of implementation details from the user. However, this interface is still rather complex and therefore the solution would be to shield all the command-line -like details from the user. As of release 1.5 the Razberry software contains support for OpenRemote through a URL (JSon) interface.
As you can see, there are in the interface description below no general management commands available for discovery of the network architecture, interviewing new devices etc. Only commands to get a certain value from a device and to set a certain values.
http://192.168.2.102:8083/ZAutomation/OpenRemote/SwitchMultilevelSet/2/0/30
The webserver will return "30" (including the quotes!). This will set my Fibaro dimmer with device number 2 (and service index 0) to 30% luminance. As you can see this is hardly an interface for novice or even somewhat advanced users.
On the z-wave.me website the following commands are specified (copy). OpenRemote API was introduced in version Z-Way 1.5.0 controller. The current version is version 1.7.2 and you are recommended to use that version. To control devices there are several HTTP commands:
http://IP:8083/ZAutomation/OpenRemote/Command/N/I/param
IP - Address of the controller RaZberry
Command - Control command
N - device Number of Z-Wave
I - Inside a device can be physically multiple devices (channels), for example 2 relay or temperature sensor, motion sensor, light sensor. The Instance parameter is a channel number within the device. If a device has only one physical device, this option is 0.
param - Parameter, which is used with some teams, for example to set the dimmer 50%
Teams (commands):
1) SwitchBinaryOn/N/I - Enables device
2) SwitchBinaryOff/N/I - Off device
3) SwitchBinaryStatus/N/I - Show on or off the device (on/off)
4) SwitchMultilevelSet/N/I/param - Open the blinds or dimming light level, param - dimming level, for example 50
5) SwitchMultilevelLevel/N/I - Show the percentage of open blinds or light
6) SwitchMultilevelStatus/N/I - Show dimmer on/off, blinds open/closed
7) AlarmStatus/N - Show whether the alarm ,"on" alarm means
8) SensorBinaryStatus/N/I/Type - Show for determining whether a binary sensor (opening movement, leakage), "on" means work.
Type - the Type of sensor is usually equal to 1
9) ThermostatLevel/N - Show temperature which must support thermostat
10) ThermostatSet/N/param - Set temperature, which must support a thermostat, param - temperature
11) ThermostatSetMode/N/Mode - Set the thermostat mode Off, Heat, Cool, Auto, Auxiliary, Resume, Fan Only, Furnace, Dry Air, Moist Air, Auto Change Over, Heat Energy Save, Save Energy Save Cool, Heat Away, Away, Cool, Full Power, Manufacturer Specific, Low Auto, On Low, Auto, High, On High, Auto Medium, On Medium
12) ThermostatModeName/N - Show the name of the regime, which is now set
13) BatteryLevel/N - Show charge batteries
14) MeterLevel/N/I/S - Show electricity consumption. S=0 for kWh; S=2 Watts
15) MeterReset/N/I - read Zero power consumption
16) TemperatureLevel/N/I - Show temperature
17) HumidityLevel/N/I - Show humidity
18) SensorMultilevel/N/I/S Is indication of the sensor S - conditional number of the sensor in the Z-Way
19) DoorLock/N - Close castle
20) DoorUnlock/N - Open the lock
This interface lacks proper documentation and examples... Therefore we like to explore another option: The standard Z-Way programming interface (JavaScript based).
This interface is the traditional "blue" interface for controlling both devices as well the Z-Wave network. The interface is not used for Javascript home automation but it is much more reliable than the zautomation interface at the moment of writing this page (Dec 2015).
The LamPI-gate.php daemon which is used to manage the gateway function in LamPI between the master node and the Z-Wave gateway machine (Raspberry) is written in PHP and uses the ZwaveAPI interface in combination with get() and set() commands to get near-real-time behaviour for the Z-Wave devices in the network.
PHP might not be the best choice, as it does not have the same networking integration for websockets and node.js, but it is the main server language for LamPI at the moment
The predecessor of the OpenRemote interface was this interface. Although the interface looks a lot like the OpenRemote interface it is less elegant ans uses a mix of URL-type words separated by "/" and other fiels separators (like { ). However, not all functions have been made available in the OpenRemote interface yet so unless we make our own commands we probably have to use parts of the Json interface for the moment.
The UI web interface described above comes in very handy if we want to get or set the status of a particular device. However, it does not allow us to receive a status update of one of the connected devices. For example, if the user would use a wall switch to switch a lamp, the LamPI software would not know this. Of course we can check the status of a LamPI every now and then but this requires more compute power as we normally want.
There are several interfaces available to manage the Z-Way software, but the Z-Way software itself also uses polling (with the get() command) in order to update the internal datastructure of the Z-Way engine with the latest values of the devices.
The first interface built for the Razberry gateway machine (a RaspberryPI) was written in php code. The LamPI-gate.php daemon was running on the same machine where the Razberry board was installed. BTW this is not a functional requirement, LamPI does not care where the LamPI-gate.php process is running, but merely a performance requirement.
The LamPI-gate.php file does 2 major tasks:
Most Z-wave devices need to be polled for a changed value. Changes might be pushed by the devices every now and then, but apart from alarm events most devices wait to be polled. A this moment we use the curl_exec interface from php to call the z-way interface on the Razberry.
We use the following curl call to obtain the complete datastructure of the z-way controller as an array (json). The datastructure is read into the program only once at the start of the progra,. From that moment on, we'll use the get() function to obtain teh latest values/updates for the devices. The $razberry variable contains the IP address of the Razberry machine (can be localhost as well).
curl_setopt_array (

$ch, array (

CURLOPT_URL => 'http://'.$razberry.':8083/ZWaveAPI/Data/'.$tim,

CURLOPT_TIMEOUT => 30,

CURLOPT_CONNECTTIMEOUT => 10,

CURLOPT_RETURNTRANSFER => true

));
$output = curl_exec($ch);
You can use other commands using curl as well. In that case, just change the CURLOPT_URL line with your own command. Some examples of how to get the values of the individual devices:
The following command gets the values for dimmer (class 38) device number 4. It interviews devices that are not battery powered:
http://192.168.2.52:8083/ZWaveAPI/Run/devices[4].instances[0].commandClasses[38].Get()
The following command sets the dim level of device number 4 to the value 15:
http://192.168.2.52:8083/ZWaveAPI/Run/devices[4].instances[0].commandClasses[38].Set(15)
The following command sets the value of a thermostat to a certain temperature (setpoint=20)
http://192.168.2.52:8083/ZWaveAPI/Run/devices[14].instances[0].ThermostatSetPoint.Set(1,20)
Especially fro battery powered devices polling on a longer interval might mean we wait too long for alarms to be recognized and polling too often will mean your battery gets drained too much. Therefore, these battery operated sensors offer the possibility to make an association between the sensor and the controller in group 3. This means that the sensor when triggered then send its value to the controller without it having to poll every minute for changed values.
I copied some documents from the Z-Wave.me website for no other reason than mae them easy to find and keep versions used for LamPI available even if on-line documentation would change.